Page Contents
- 1 OVERVIEW
- 2 FUNDAMENTAL PERI-PROCEDURAL TASKS
- 3 READING DIAGNOSTIC IMAGING
- 4 BASIC CONVERSIONS AND MEASUREMENTS IN INTERVENTIONAL RADIOLOGY
- 5 UNDERSTANDING AND UTILIZING ROOM EQUIPMENT IN THE INTERVENTIONAL RADIOLOGY SUITE
- 6 BASIC TECHNICAL SKILLS RELEVANT TO INTERVENTIONAL RADIOLOGY
- 7 START UP TRAYS
- 8 SCRUBBING INTO CASES
- 9 STERILE PREP FOR THE CASE
- 10 BASIC TASKS PRIOR TO THE START OF A CASE
- 11 COMMONLY USED EQUIPMENT DURING CASES
- 12 KEY SKILLS AT THE START OF THE CASE
- 13 GAINING ACCESS AT THE START OF THE CASE
- 14 WIRE HANDLING/MANAGEMENT
- 15 CLOSING ACCESS SITES/SECURING DEVICES/APPLYING DRESSINGS AT THE END OF A CASE
- 16 REMOVING IR EQUIPMENT FROM THE PATIENT WHEN IT IS NO LONGER NEEDED
- 17 COMMON INTERVENTIONAL RADIOLOGY CASES
OVERVIEW
This page is dedicated to serving as a primer for trainees that are new to the field of interventional radiology (IR). The content on this page can be found throughout the interventional radiology section of this website, however it is also organized here for the sake of convenience. While this page aims to serve as a good primer there are other established resources for IR that complement the content of stepwards.com.
FUNDAMENTAL PERI-PROCEDURAL TASKS
There are fundamental peri-procedural tasks that are universal and apply to many different types of radiology procedures which are organized and discussed further on this page. A good example of such a task is how to perform a chart review (and write a H/P note).
READING DIAGNOSTIC IMAGING
A big component of interventional radiology is being able to interpret diagnostic imaging studies. Every study in radiology can have a “search pattern” which refers to a guide on how to read through the study in question. The search patterns for various imaging studies are organized here.
The search patterns for various CT studies are organized here:
BASIC CONVERSIONS AND MEASUREMENTS IN INTERVENTIONAL RADIOLOGY
Measurements in interventional radiology can get confusing because needles are measured in GAUGES, wires diameters are measured in INCHES, and other equipment (such as catheters, sheaths, etc) are measured in FRENCH. This page is decanted to discussing this topic in greater detail to provide some clarification on this quirky aspect of interventional radiology.
UNDERSTANDING AND UTILIZING ROOM EQUIPMENT IN THE INTERVENTIONAL RADIOLOGY SUITE
Many different types of technical equipment are utilized in the interventional radiology procedure room. It is important to try and become familiar with these pieces of equipment because they are often times relied upon heavily during a case. Some examples are listed below:
- Using Ultrasound For Interventional Radiology Procedures: this is a very large topic however a video series that introduces how to use ultrasound for interventional radiology procedures is linked here.
BASIC TECHNICAL SKILLS RELEVANT TO INTERVENTIONAL RADIOLOGY
Trainees may have been exposed to some of these technical skills from other specialties, however they are also very useful to the field of IR.:
- Suturing Basics: while this guide was initially made for those interested in surgery, the skills and techniques discussed are very useful for those in IR as well.
START UP TRAYS
These refer to the start up kits/trays that the technicians will use to prepare for each interventional radiology case. They contain stock items (such as syringes, waste management systems, bowls, towels, etc) that are routinely used during various cases.
- Custom Waste Management Start Up Tray: this is a more limited kit that can be used for smaller cases. The linked video shows what is included in a kit like this one.
- Soft Tissue Biopsy Tray: this is a common start up tray that is used for biopsies but also for other basic procedures.
SCRUBBING INTO CASES
As a new trainee it is important to understand that the manner in which people “scrub into” cases is different for most IR procedures. Unlike most surgical specialties for IR cases it is important to be familiar with how to scrub yourself into the case (this essentially involves putting on your gown and gloves by yourself in a sterile fashion). The general workflow for scrubbing into a case involves acquiring your gown/gloves, opening them up, washing your hands, and then carefully putting on your gown, and then using your gown to put on your gloves in a sterile fashion.
For more detailed reference please reference the dedicated page on how to scrub yourself into interventional radiology cases which provides instructional videos as well.
STERILE PREP FOR THE CASE
Often times after scrubbing into the case, there may be sterile prep work that needs to be conducted to prepare for aspects of the procedure. This can include the following tasks:
- Prepping A Procedural Site (Sterilizing And Draping): a important step before the case is to sterilize and drape the area(s) where the procedure will be performed. This page helps elaborate on this topic.
- Prepping The Ultrasound Probe: the linked page that discusses the sterile ultrasound probe cover also includes a video that shows how to apply this cover to the probe in a sterile fashion.
BASIC TASKS PRIOR TO THE START OF A CASE
After scrubbing into a case there are often certain tasks that need to be done to prepare the equipment that is routinely used at the start of the case. This includes the following:
- Filling Syringes (Saline/Contrast): very routinely at the start of the case the empty syringes used for contrast and saline injections will need to be filled. It is important to be familiar with the apparatus used to fill these syringes as it is often times the role of more junior trainees to make sure these syringes stay filled. Please refer to the linked page for a detailed video on how to use the apparatus for filling these syringes as it is a bit nuanced. It involves lines for saline, contrast, and then also a line for flushing syringe contents into a waste collection bag.
- Flushing Wires: and most any device that has a leur lock compatible port (needles, catheters, dilators, sheaths, etc) will generally be flushed at the start of a case. This includes wires which are packaged in casings that allow for the to be flushed easily. The linked page shows how this can be performed. It is important to realize that there are exceptions to this flushing rule (such as NOT flushing balloon ports on devices such as balloon dilators, drainage tubes with balloon retention devices, etc).
COMMONLY USED EQUIPMENT DURING CASES
There are many different types of equipment that are used in the field of interventional radiology (an overview of equipment can be found here) however the list below identifies some of the most commonly used things and provides linked pages with more information:
- Micropuncture Kit: this kit is used very commonly at the start of the case to gain access. The linked page shows the kit components, how to prepare/flush each item, and then also includes a video on how to actually use the kit itself.
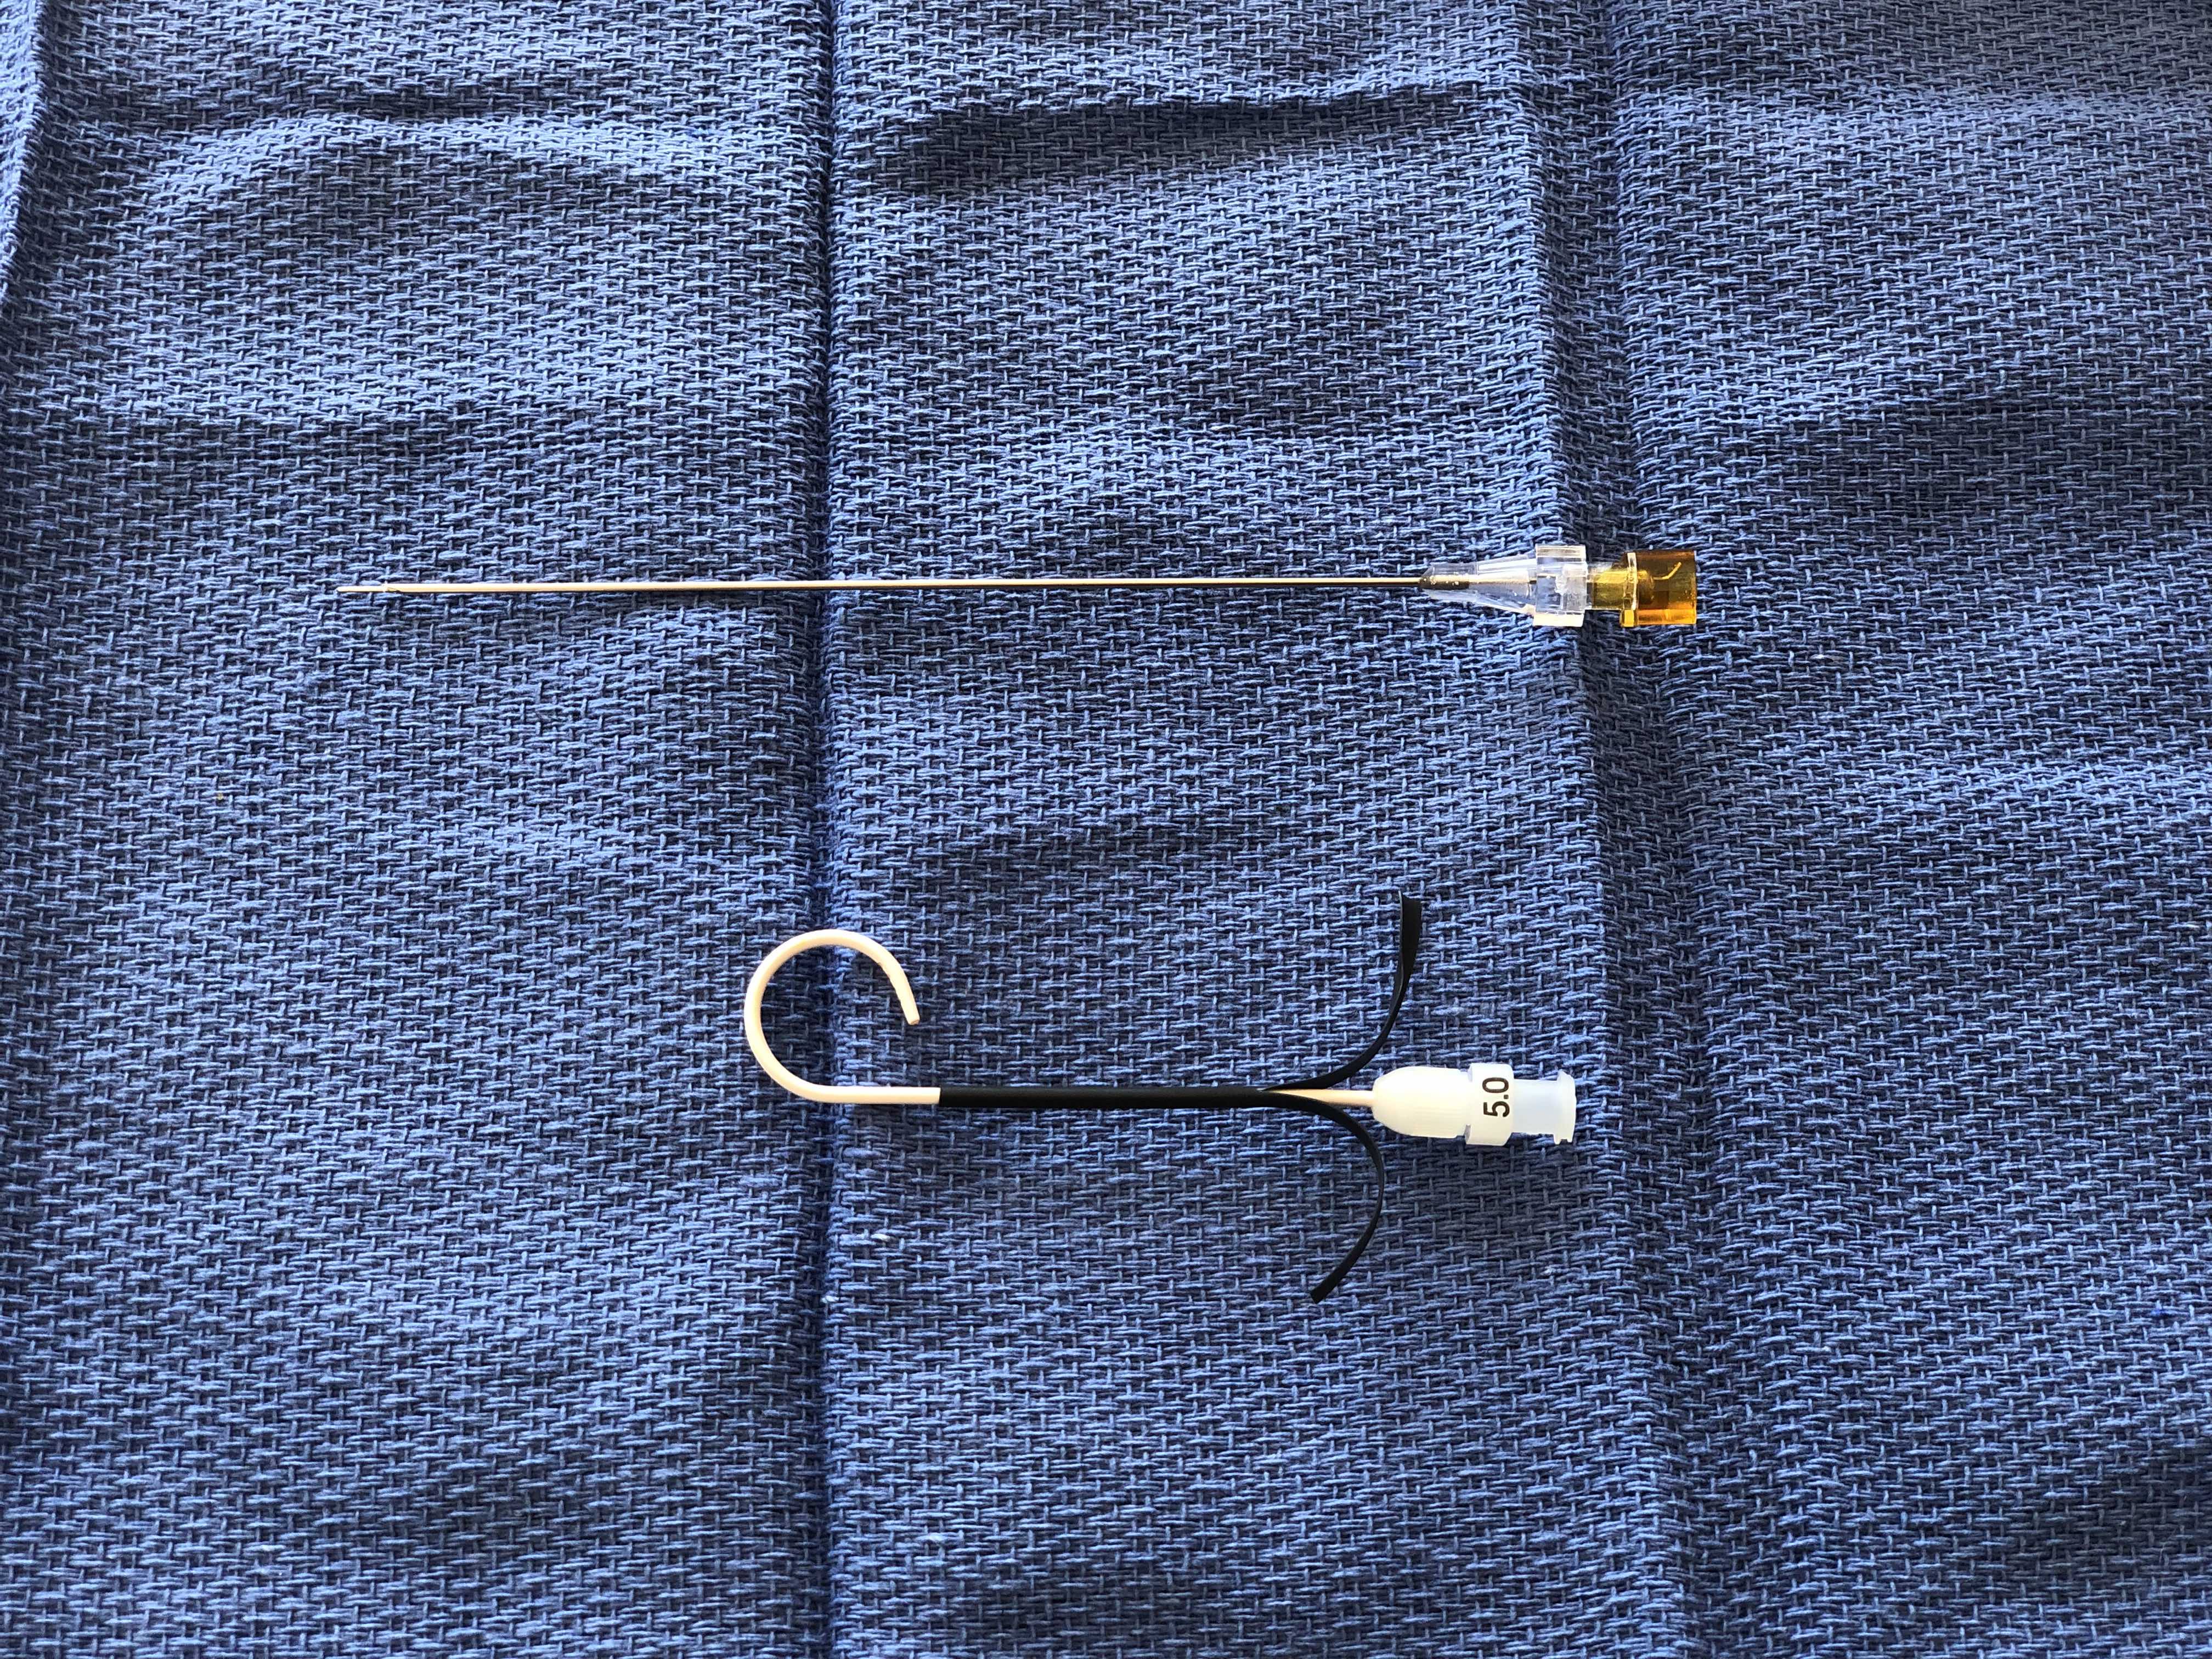
- Yueh Needle: this type of needle/catheter system is very commonly used. This linked page covers how to use the curved, pigtail Yueh needle however there is also a page dedicated to the straight Yueh needle.
- Vascular Access Sheath (Percutaneous Sheath Introducer Set): this set is used very commonly at the bringing of a case to establish long term access. The linked page shows the kit components, how to prepare/flush each item, and then also includes a video on how to actually use the kit itself.
- Multipurpose Drainage Catheter Kit (Dawson-Mueller Drain): This kit is commonly used in interventional radiology to place drains all over the body. It is important to be familiar with the kit components and how the drain works (which is discussed on the linked page/videos).
- 3-Way Stopcock: while a simple device, its usage can be tricky for new trainees. The linked page provides a video which shows clearly how to use the 3-way stopcock to avoid unnecessary spills.
- Torque Device: This is a very commonly used piece of equipment that is often times used with wires to direct and twist the wire (i.e. torque the wire).
- Tuohy-Borst Adapter: A Tuohy-Borst Adapter is a nuanced piece of equipment. It is important to understand how it works, and the linked page provides a video showing how to use the adapter with a microcatheter.
- Chest Port Kit: This kit (and others similar to it) is commonly used in interventional radiology to establish long term access in patients that require long term infusions. The linked page provides a video that goes over what is included in this kit and how to prepare the port for usage before the start of a case.
- Hemodialysis Catheter Kit (Tunneled Dialysis Line): This kit is commonly used in interventional radiology to establish long term dialysis access in patients that are hemodialysis dependent. The associated link goes over an example kit and explains how to prepare this catheter prior to is usage.
- Gastrointestinal Anchor Set (T-Fasteners/T-Pexy Devices): This set is commonly used in interventional radiology when placing a percutaneous gastric tube (PEG tube). The associated link goes over an example kit, shows how to place the fasteners, and then also discusses their removal as well.
- Microcatheter Set: Microcatheters can be a bit difficult to handle at first, however if you understand how the system works it is much less daunting. The linked video goes into great detail about how to use the microcatheter system.
- Microsnare Kit: Not the most commonly used piece of equipment, however snare systems (both micro and non micro) are a bit nuanced and benefit from having some clarification provided on how the kits are used. View the associated page to learn more about snares.
KEY SKILLS AT THE START OF THE CASE
It is important to start off the case smoothly. This will set the tone for the rest of the case. Some key skills are explained in further detail with the associated links below to help and do this:
- Administering Lidocaine Properly: Administering lidocaine will be the first time that the patient’s skin is punctured. It is an opportunity to help control the patient’s pain and discomfort, however if not administered properly can lead to unnecessary pain and rattle the confidence of new trainees. It is a simple task but is nuanced. As a result look over the linked page (and the associated videos) to learn more about this topic.
- Unsheathing/Re-sheathing The Scalpel: Unsheathing/re-sheathing the scalpel properly is an important component of handling sharps appropriately. While not a complicated technique, it is important to know.
- Performing A Dermatotomy/Skin Incision: While making a dermatotomy isn’t required for every case, it is important to realize that their are instances where it will inserting certain equipment/devices easier through the area that is being accessed.
GAINING ACCESS AT THE START OF THE CASE
The case arguably actually begins when access is established into a structure of interest. Being able to gain access into a desired structure is an important skill and helps set the tone for the case.
- Internal jugular vein access: this is a very commonly accessed site, and can be a good vessel for new trainees to practice gaining access on. The linked page helps give a comprehensive review about the different steps and considerations one should take for gaining access into the internal jugular vein.
WIRE HANDLING/MANAGEMENT
A core component of working in interventional radiology involves working with wires. While not necessarily the most complicated topic, handling wires effectively and being able to manage organizing multiple wires on the table is a useful skill. Some specific points on this subject include:
- Straightening The Tip Of A J Wire: While a simple concept, understanding how to straighten the tip of a J wire is not completely intuitive. The linked video below shows how this is done (and it is important to note that this skill can be applied to other similar wires).
- How To Gather A Wire: it may not seem like such a huge topic, however as things speed up during a case it is important to be skilled in how to gather a wire quickly and effectively without compromising the integrity of the wire or its sterility. Observe the linked page which includes a video on this topic.
- Re-sheathing Wires (Placing Them Back In Their Packaging/Casing): it will depend on the situation however sometimes it is advantageous to put a wire back in the casing it was packaged in. The linked page offers more on this topic.
- Loading Equipment Onto The Wire: it can be tricky loading small devices onto thin wires given that the wire will need to be threaded through very small holes. Small technical considerations discussed in the linked page/video can help make this skill second nature. Mainly using ones finger on the back end of the wire as a scaffold for loading things onto the wire is useful.
- Advancing Equipment Over The Wire (Pinch/Push Technique): it is very critical to avoid moving the wire when advancing equipment over the wire. It is dangerous for the wire to move forward without knowledge of the interventional radiologist. Similarity if the wire moves back access into a specific anatomical space may be lost unnecessarily. It is for this reason that a pinch/push technique is implemented which involves pinching the wire and pushing the device that is being advanced to ensure that the wire does not move. The linked page/video helps demonstrate this technique.
- Removing Equipment Off The Wire (Pinch/Pull Technique): it is very critical to avoid moving the wire when removing equipment off the wire. It is dangerous for the wire to move forward without knowledge of the interventional radiologist. Similarity if the wire moves back access into a specific anatomical space may be lost unnecessarily. It is for this reason that a pinch/pull technique is implemented which involves pinching the wire and pulling the device that is being removed to ensure that the wire does not move. The linked page/video helps demonstrate this technique.
- Securing The Back End Of The Wire (Anchoring The Wire): often times it is useful to secure the back end of the wire to make sure that it does not move. The wire is pinched and then ideally the anchoring hand is rested on stable surface. The linked page/video demonstrates this technique.
CLOSING ACCESS SITES/SECURING DEVICES/APPLYING DRESSINGS AT THE END OF A CASE
At the end of cases it is important to make sure that access sites are closed, devices are properly secured, and that dressings are applied neatly and properly to the patient as needed. Not only is this what the patient and other providers will see, however these dressings also serve a medical purpose (limiting oozing/bleeding, preventing infection, allowing for proper wound healing, etc). It is important to be comfortable and capable with dressing types listed below:
- Closing AV Graft/Fistula Access Sites (Purse String And Toggle Technique): when accessing AV grafts/fistulas it is important to realize that they are high pressure systems. The linked page shows one technique to close these access sites using a a purse string suture as well as a “toggle” device (cut piece of a dilator/introducer) to securely close down the access site. The link also discusses how to remove these toggle devices after they no longer are needed.
- Closing Femoral Artery Access Sites (Angio-Seal Vascular Closure Device): the linked device is one used very commonly to close femoral artery access sites. The linked page explains how the kit works and how to use it properly during a case.
- Closing Radial Artery Access Sites (TR Band Radial Artery Compression Device): this is a device that is used to apply compression to a radial artery access site at the end of a case. The linked page shows what is included in the kit, how to use it, and then how to remove the device when it is no longer needed.
- Suturing Tubes In Place: There are various ways to suture tubes in place to secure them. Some of this techniques are shown in videos on the linked page. Regardless of the method used, it is important to find a system where you can secure a tube in place so that it is not removed by accident.
- Suturing Lines In Place: There are a number of techniques that can be sued to secure lines in place (such as tunneled catchers, etc) after they have been placed. The associated link shows a variety of these techniques.
- Securing Tubes/Lines With The Statlock Device: Statlock devices are often times included with various kits to secure lines/tubes to the skin of a patient. The linked page shows how to use this device.
- Dressing Puncture Sites (2×2 Gauze With Tegaderm): this is perhaps the most commonly applied dressing given that most all IR cases will have some type of puncture site (which are commonly covered in the fashion shown on the linked page/video).
REMOVING IR EQUIPMENT FROM THE PATIENT WHEN IT IS NO LONGER NEEDED
Often times many fo the devices, equipment, lines, and/or tubes that are placed in the field of IR are not meant to be used indefinitely (or the patient reaches a point in their care where these items are no longer indicated). As a result, it is important to be familiar with the proper removal of IR equipment.
- Removing Secured Drains/Tubes From The Patient (Ex: Abdominal Drain): drainage catheters (such as abdominal drains) will have to be removed after they no longer needed. The techniques used to remove a secured drain/tube is shown in the lined page/video.
- Removing IR Chest Tubes (Pigtail Catheters): Once an IR placed chest tube is ready to be removed there are a number of ways that this task can be performed. The associated link/video shows this technique.
COMMON INTERVENTIONAL RADIOLOGY CASES
Below are some common cases that are performed in interventional radiology. The linked pages offer more details about each individual procedure.
- Paracentesis: this is a very commonly performed procedure by various types of providers including both diagnostic interventional radiologists.