Page Contents
INTRODUCTION
This page is dedicated to teaching the basics of suturing that are relevant for surgical applications. The videos are shot from the point of view (POV) of the instructor to help give the appropriate perspective.
The goals of this page or not to recreate all of the great suturing videos that already exist, but to rather do the following:
- Organize the steps of suturing practice exactly in the order that will occur in the operating room.
- Explain the basic (yet critical) steps of important suturing components that are overlooked.
- Provide trainees with a practical framework for practice that will allow for maximizing one’s time.
The video below gives a good introduction as to how to approach utilizing this page for practicing suturing.
IMPORTANT COMPONENTS
Before diving into all the steps of the suturing practice, let us take a look at what is perhaps the most common operating room scenario for a trainee who is going to be suturing. The process can be broken down into the major steps below (that are going to probably occur more or less in this order). The videos on this page are dedicated to teach you how to practice all of these steps.
- Holding your forceps: before you can begin suturing, you must pick up your tools, your Adson forceps sometimes being the first tool you grab.
- Holding your needle driver: next, with forceps in hand, you will have to pick up and handle your needle driver.
- Loading your needle driver: once you have both of your tools, you must load your needle in the driver and get ready for some suturing.
- Throwing your suture/needle: the next step will be actually throwing the needle through the tissue that you are suturing.
- Protecting you needle: in between your throws, and the point where you need to tie knots, it is important to protect your needle to to avoid needle sticks!
- Tying square knots: once you have completed your throws, and your needle is protected, you can begin tying your square knots. This can be done either with an instrument or by hand.
IT IS CRITICAL that you practice these skills in this general order and that you become comfortable performing them in the above order. Some suturing workshops teach you how to hand tie before handling your tools WHICH MAKES NO SENSE! Before hand tying is done, a suture must be thrown (which requires a proper understanding of all of the components listed above that preceded the needle throw!).
If you have the time my recommendation is to practice and master these skills in the above order. It may seem to be boring to practice handling your forceps and needle drivers, however it is MUCH EASIER to practice loading your needle driver if you are already comfortable handling your tools.
HOLDING YOUR FORCEPS
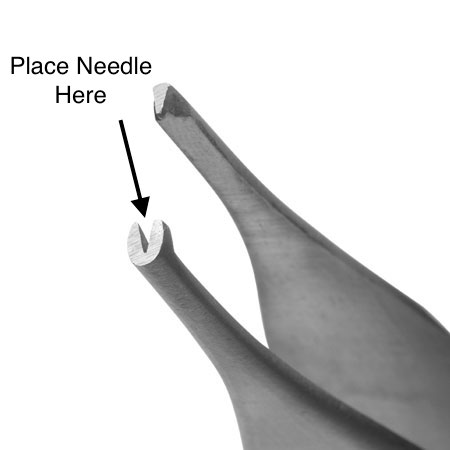
It may seem like a basic skill, however do not overlook how important this is. The forceps that you most often will use are adson forceps. Note the tooth pattern of these forceps, and take special note that the space in between the double toothed side is a practical place to hold your suturing needle!
HOLDING YOUR NEEDLE DRIVER
A pretty critical skill (that is often not fully discussed) there are 2 major ways one can hold their needle drivers: using the finger loops or without using the finger loops. We will cover both below.
Using the loops: this is an important skill to master (because you will hold suturing scissors in the same fashion). Generally using the loops of the driver will be a more stable way to hold the tool and is useful for suturing through tissues that are tougher and require the extra stability.
Palming the driver (without the loops): ultimately my recommendation is that you also learn this style of holding the needle drivers as well. It may seem unnecessary at this point, however the video below will explain how advantageous it is to be able to handle a needle driver without having to rely on placing your fingers in the loops. It affords a lot of flexibility and also enables the surgeon to pick up the instruments and use them more quickly. Once you begin palming the drivers you will find that it is often a less clumsy alternative to using the loops.
LOADING YOUR NEEDLE DRIVER
Once you are comfortable handing your forceps and needle driver, the next step is to make sure you are proficient at loading your needle driver with the suturing needle. This may seem tedious, however it is one of the more challenging parts. As we discussed above the adson forceps have a particular double toothed side that is great for placing and holding your needle depending on the size of the needle/forceps (shown below, source).
The video below will help guide you through the different ways that you an load the needle (and why one would load it in these fashions). Become as comfortable as possible loading the needle in as many practical ways as you can!
PRACTICING WITH A TOWEL
It may seem as though an odd practice aid to have, however using a towel to practice your suturing skills in high volume is actually very practical. The video below explains on how a simple towel can help you practice your skill. Regardless of what you want to use, make sure you have plenty of material that you can suture as you get ready to practice your throws!
THE THROW
There are many different types of suturing styles (simple running suture, running locked suture, subcuticular suture, etc) however they all more or less have a common “throw” that has the major components discussed in the video below. When you have mastered the skills above (and have your favorite towel picked out to practice on) you can now practice throwing your needle over and over agin to make this second nature.
PROTECTING YOUR NEEDLE
While a simple thing, after you complete your throw(s) but before you tie with hour instrument/hands you should protect your needle. This means clamping it in your needle drive in such an orientation where it is not possible for anyone (including yourself!) to stick yourself with it.
INSTRUMENT TYING
Going in order, after you have completed your throws, and protected your needle, it is probably time to tie some knots! We will cover instrument tying first here in the video below, but it is important to make sure you remember that learning hand tying (next section) is also very important!
HAND TYING (TWO-HANDED)
Now that we have covered all the skills above, it is time to go over two-handed tying. It is not until you can do all of the skills above that you can even begin to hand tie, which is why we have saved this for last! It is important to keep in mind that unlike instrument tying where you just change the direction that you pull the ends of the suture, hand tying requires tying different styles of knots (covered below). This enables the tying of the “square knot”.
Knot #1: This knot can be tied on either hand and uses the thumb as a means of creating the loop that the suture is threaded through. This is more clear in the video below.
Knot #2: This second knot is identical to the one above, but is inverted and instead uses the index finger for creating the loop.
Combing the knots: alternating the two hand tied knots above together will enable for the tying of square knots. Practice this as much as you can (if you run out of suture you can use any type of string, even floss!).
LOOKIGN AHEAD
It is very important to keep in mind that everything outlined above only covers the very basics (and there is much more to learn when it comes to suturing such as one handed tying etc). With this in mind however, a mastery of the skills above will help enhance your learning moving forward and will hopefully provide you with a solid base to make everything you learn in the future easier!
Page Updated 06.26.2016