Page Contents
- 1 OVERVIEW
- 2 IMPORTANT CONSIDERATIONS BEFORE BEGINNING THE PROCEDURE
- 3 SUMMARY OF STEPS
- 4 STEP 1: PREPARE THE PATIENT
- 5 STEP 2: ESTABLISH VASCULAR ACCESS
- 6 STEP 3: MEASURING CATHETER LENGTH
- 7 STEP 4: CREATE CHEST POCKET
- 8 STEP 5: ASSEMBLE CHEST PORT
- 9 STEP 6: INSERT CHEST PORT
- 10 STEP 7: TAKE FINAL IMAGE
- 11 STEP 8: SUTURING/CLOSING
- 12 STEP 9: APPLY DRESSINGS
- 13 STEP 10: LEAVE PORT ACCESSED (OPTIONAL)
OVERVIEW
This page is dedicated to describing how to conduct an chest port placement. This is a procedure that is commonly conducted in the field of interventional radiology in order to give patients a semi-permanent form of venous access (that can be used for intravenous treatments such as chemotherapy).
Make sure to read this page dedicated to chest ports as well as this page dedicated to their radiological appearance as references.
IMPORTANT CONSIDERATIONS BEFORE BEGINNING THE PROCEDURE
What Type Of Port Will Be Placed:
There are multiple models and types of chest ports. It is important to make sure the specific type of device that will be implanted is decided upon prior to the procedure.
Patient Risk For Bleeding:
There are a few lab values that are evaluated to evaluate if a patient contains a significant risk for bleeding (and if it is safe to conduct this procedure):
- INR:
- Platelet count:
- Hemoglobin:
What Side Will The Port Be Placed On/What Venous Access Point Will Be Used?
Typically chest ports placed by interventional radiologists are placed on the right side of the patient, using the internal jugular vein as an access point. In certain circumstances however (in cases of anatomical complications etc) ports may have to be placed on the opposite side/with a different access point.
SUMMARY OF STEPS
Here are the major steps of performing a chest port implantation:
- Prepare the patient
- Establishing vascular access
- Measuring catheter length
- Create chest pocket
- Assemble chest port
- Insert chest port
- Take final image
- Suture chest port in place
- Suturing/closing
- Apply dressings
- Leave port accessed (optional)
STEP 1: PREPARE THE PATIENT
The neck and chest on the site of where the port will placed needs to be sterilized and draped. Both the neck and upper chest need to be exposed to allow for vascular access
STEP 2: ESTABLISH VASCULAR ACCESS
In the case of chest port implantation, usually the internal jugular vein on the side the port will be implanted will be accessed. With the guidance of ultrasound the internal jugular vein should be accessed right above the clavicle (right above the level where it joins the subclavian vein). For reference, read the page on establishing vascular access.

Once access is established, the micro-wire (in the micro-puncture kit used to gain access) can be exchanged for a larger guide wire. This larger guide wire should be inserted into the jugular vein, all the way into the inferior vena cava. The wire should be inserted until the point that it goes beneath the diaphragm (on the right side of the patient). This confirms proper location of the wire as the inferior vena cava is the only venous structure that can go beneath the diaphragm from that can be reached from the internal jugular vein.

STEP 3: MEASURING CATHETER LENGTH
There are multiple ways that one can measure the length of the chest port catheter to ensure that its tip will sit in the correct location in the atrial/caval junction. After establish vascular access, where the location of the incision (for the placement of the chest port) should be marked. Generally this site should be ~4 finger breadths below the clavicle (on the side of vascular access).
After this site has been marked, the tip of the guide wire present inside the internal jugular vein of the patient should be drawn back to ~2 vertebral bodies below the level of the carina. This is generally the level at which the catheter tip should sit. The external end of the wire should be pressed against the patient’s body (in the general trajectory that the tunneled catheter will eventually take) and the wire should be clamped at the level of the marked incision. This clamped wire can now be removed and measured from its tip to where it is clamped. This should accurately approximate the length of the catheter that is needed.
The catheter tubing can now be trimmed to the measured length.
STEP 4: CREATE CHEST POCKET
Now that the incision site has been marked (again ~4 finger breadths below the clavicle) the chest pocket can be created where the port
STEP 5: ASSEMBLE CHEST PORT
Each port kit can be slightly unique, however the general principle of assembling the port is the same. The trimmed catheter is connected to the port.
After the port is assembled it can be tested to make sure that it flushes properly.
STEP 6: INSERT CHEST PORT
After the port is flushed, the tip of the catheter can be connected to the tunneling device included in the kit.
If the chest port is going to be sutured in place, 2-0 proline can be used to throw 2 sutures on either side of the port (through deep dermal tissues) to keep the port in place. At this time these sutures will not be tied, but they will be clamped.
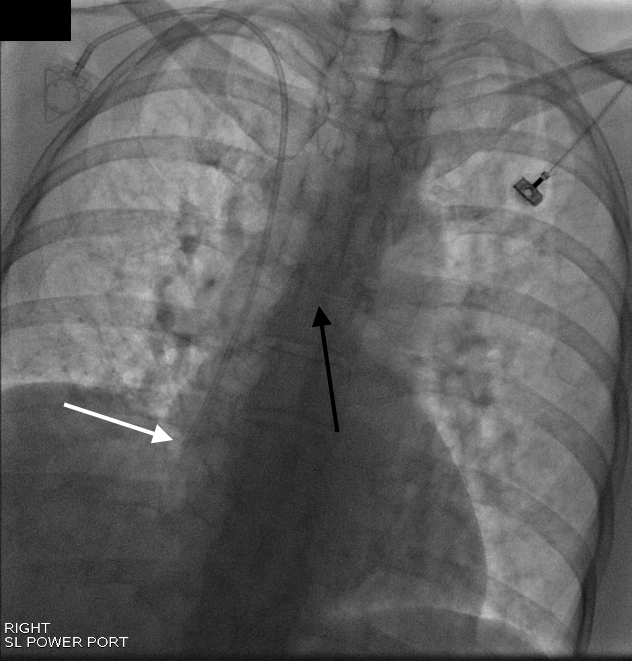
STEP 7: TAKE FINAL IMAGE
At the end of most IR cases a final image will be acquired to show that the procedure was a success. In the case of a chest port placement a PA frontal image is taken of the chest that should include the entire implanted chest port, and should demonstrate that the catheter is ~ 2 vertebral bodies lower then the level of the carina.
STEP 8: SUTURING/CLOSING
After the final image is taken, and the port/catheter is confirmed to be in ideal position, the proline suture that was thrown through the deep dermal issues can be tied to the port to keep it secure in place.
2-0 Vicryl sutures can be used to close the deep dermal layer (interrupted buried sutures).
4-0 Vicryl sutures can be used for closing the subcuticular layer (running subcuticular suturing technique).
STEP 9: APPLY DRESSINGS
STEP 10: LEAVE PORT ACCESSED (OPTIONAL)
Page Updated: 10.14.2017